If you have used the Internet for any amount of time, you’ll become familiar with some numerical codes. They’re usually related to errors, such as 404 (Page not Found), 403 (Forbidden), and 500 (Server Error). The most common numerical code issued is one that’s not seen – 200 (OK). That means the request was received, acknowledged, and approved. The fact that you can see this page is because of the 200 code.
There are two codes though that are used when it comes to redirecting URLs, and they’re commonly used with promotional URLs or URL shorteners. These are 301 (Moved Permanently) and 302 (Found). But how do you use them? And if they’re both used to redirect URLs, why not just use one?
Each code does something different, and understanding what each code does might help you to understand how to use each one.
There are more than two codes.
As part of the HTTP/1.1 standards, there are five codes for redirects: 301 (Moved Permanently), 302 (Found), 303 (See Other), 307 (Temporary Redirect), and 308 (Permanent Redirect). Codes 307 and 308 do specific things that 301 and 302 respectively don't and were introduced after the original HTTP/1.0 standards were published, but they aren't supported in all browsers, especially older ones. Because of that, it is recommended that you continue to use 301 and 302 redirects.
Why do we use redirects?
A URL Redirect sends you from one address to another. Typing “nathanhawkes.dev/sylvia” will take you to a blog post talking about my late boss and closest friend. I can use that URL to share on posts, social networks, posters, emails, or whatever I use, and it’s easier to remember than “nathanhawkes.dev/2021/03/dr-sylvia-sham-1960-2016/“.
Depending on what URL you use, redirects can help in quite a few ways. In the instance above, it gives me a short URL that I can promote, associated with my domain, and others can remember it easily. This is also handy with adverts, where you can use a shorter URL to direct users to the target page that may be buried in your site somewhere.
URL shorteners are another example of this, taking an intentionally shorter URL like “nhdev.ml/zero” and sending you to “nathanhawkes.dev/projects/projectzero/“. You can use a service such as Bitly or TinyURL that will provide and manage the software for you, which you can use on their URL or your own. Alternatively, you can download software such as YOURLS and install it on your own server. These are great if you want to track URLs with analytics as well, as many of them will be able to show you the source of the traffic. Some short URLs can be used as part of a branding exercise, with companies like Virgin, Google, and YouTube using vanity branded URL shortening services.
There are many different reasons to use a redirect, but to work out which one is best for you, we need to talk about the difference between each type.
So what's the difference?
301 (Moved Permanently) Redirects
A 301 redirect tells search engines and users that the page has been moved permanently. All records in search engines will be updated to reflect this change, and whatever SEO scores were applied to the old URL will instead be applied to the new one.
You can think of a 301 redirect as a form with the Post Office to have letters redirected. Any letters sent to the old address that match certain conditions (in your name, to a certain flat number, etc.) will be moved to the new address, and any new spider crawls will accept the new URL without needing the old URL. You may find that the old URL is still indexed in search engines, but typically the new one takes precedence.
You would likely use a 301 redirect when you want to:
- permanently change the URL of a page
- permanently move your site to a new domain
- move your domain from HTTP to HTTPS
- force all non-www URLs to www URLs, or vice versa
- merge two pages into one, and redirect the old pages to the new page
- permanently change the URL structure, such as changing your permalinks
302 (Found/Moved Temporarily) Redirects
A 302 redirect tells search engines that the page has been temporarily moved, rather than permanently like 301 redirects. Anything redirected this way is usually for a limited time and will not be cached or saved locally. Unlike 301 redirects, search engines will treat the two pages as active URLs, so may give different weights to each page. It is also possible that the wrong page will be listed in results, resulting in an unwanted redirect chain.
Where 301 redirects need to be set on the server and need special rights, it is possible to set a 302 redirect with just a single <meta> tag or a simple piece of code on a page. This makes it easier to add a redirect on your site, but also makes it possible to accidentally redirect a visitor from one page to another.
You would likely use a 302 redirect when you want to:
- redirect a user to the right section of the site (for example, if you use a different section for a different language)
- run some “split-tests” (called A/B tests) to test how the site functions
- get information and feedback on a new page, without affecting your search ranking on your old page
- run a seasonal campaign or a competition that involves redirecting users to a new page
The general rule of thumb is that you should use a 302 redirect if you don’t want to affect the original URL or will bring it back at some point. If you don’t think you will bring it back, use a 301 redirect.
How do they differ from 307 and 308 redirects?
307 and 308 redirects are newer and part of the newer HTTP/1.1 standards. Unfortunately, that means not all browsers support them, and most older browsers will not support them at all. They have a specific feature that makes them more suitable than 301 and 302 redirects: they maintain the HTTP request type.
There are two important request types: GET and POST.
GET pulls information from a URL. When you type the URL into your browser, your computer will send a GET request to the server and pull the information the server gives to your machine. It doesn’t change anything on the server, it doesn’t modify anything for anyone else, it just tells the server “I need to get this information from you.”
POST, on the other hand, sends information to a URL. This is usually when you submit a form or post content to a blog or send an email via a webmail service. Anything that is sent via a POST request is modified on the server and may be seen by those with appropriate access privileges. That’s like telling the server “I need to post this information to you.”
With 301 and 302 redirects, these requests are not usually maintained. Unless told otherwise, they will default to a GET request. The newer 307 and 308 redirects will maintain that request. In most cases, you won’t need to worry about it and the older redirect codes will be more than sufficient, but there may be times when the newer ones are necessary.
How do I create a redirect?
If you are using a WordPress website, there are multiple plugins that you can use to create redirects. Some SEO plugins will have a built in URL redirect script. There are also specific redirect plugins that will do the job for you. Just look for “301 redirect” in the WordPress plugin directory.
For the purposes of this post, I’m going to use Smartcrawl from WPMU DEV. I use this on my sites and recommend it to clients because it builds in redirects with the free version (Yoast, another popular SEO plugin, includes redirects in the paid version). If you’re feeling particularly saucy and technically minded, I’ll also add in the code for .htaccess files and the <meta> tags for a 302 redirect.
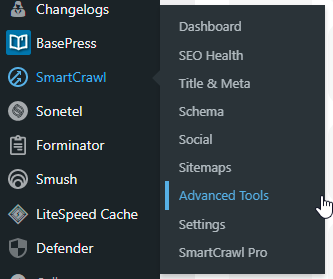
Head on over to your site’s dashboard, which you can usually access at mycoolsite.tld/wp-admin/. Obviously you would use your site’s address there. In the menu on the left, go down to “SmartCrawl” and then click “Advanced Tools”.
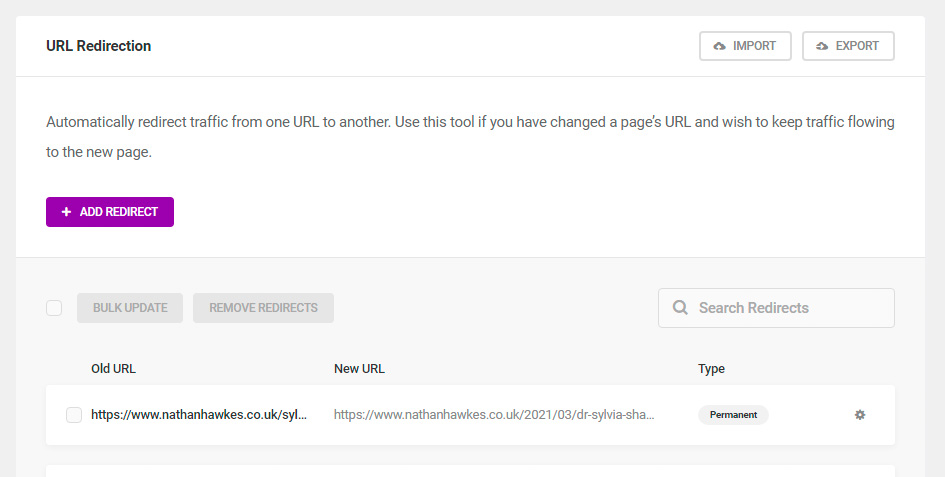
You’ll get a window that pops up that lets you add any new URLs. There should be none listed (unless someone else is already managing this on your site). Click the “Add Redirect” button to get started.
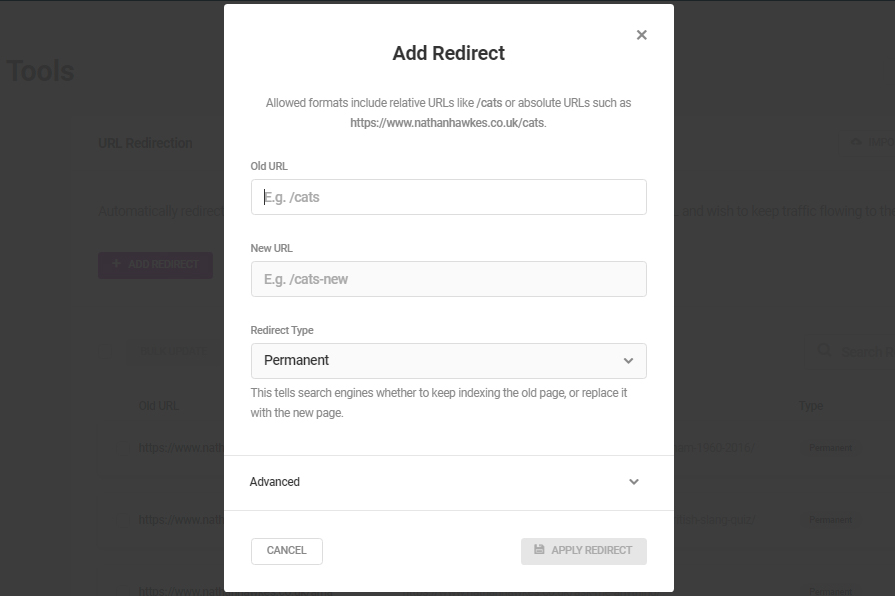
When you click “Add Redirect”, you’ll get a popup window with three options: “Old URL”, “New URL” and “Redirect Type”.
In the “Old URL” box, type in the URL that you will be redirecting from. So, for example, if I wanted to go from nathanhawkes.dev/cats to another URL, I would enter /cats or https://nathanhawkes.dev/cats. Both are accepted.
In the “New URL” box, I type the URL that you will be redirecting to. Maybe I want anyone who visits the old URL to go to a blog post about my cats, so I can type /post-about-my-cats in the box. Or maybe I want that URL to go to the Cats Protection Charity, so I might type https://www.cats.org.uk/. Actually, head over there anyway. Some of those kitties need some love.
In the “Redirect Type” option, you can select between “Permanent” and “Temporary”. A 301 redirect is considered a “Permanent” redirect, and a 302 redirect is considered “Temporary”.
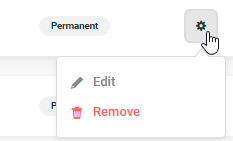
Once you click “Apply Redirect”, the redirect will be saved in the database. You can edit the redirect by clicking on the cog at the end of each record and click on “Edit”. Alternatively, click on “Remove” to remove the redirect.
Before you save the redirect, you can set some advanced options. These are entirely optional, but can help to manage your redirects.
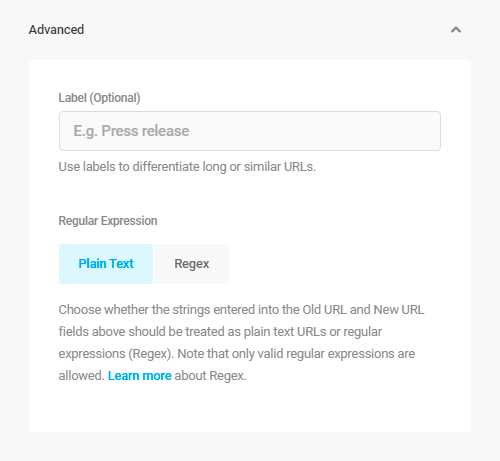
The first option is the redirect’s label. It doesn’t matter if you use this and it won’t affect the redirect itself, but it will let you manage multiple URLs with a simple keyword or phrase, which is good if you have similar URLs or a lot of URLs to manage.
The second is “Regular Expression” and is more for advanced users. This is a way of filtering patterns and strings. You can use this, for example, to send all URLs that match a certain pattern to a specific target. This is how I have redirected all of my projects from my personal site to my professional site. Since they all use the same structure, I can set an expression to filter all URLs that go to nathanhawkes.dev/work/{my-project} to go to cocode.co.uk/work/{my-project}. By default, all URLs are saved in plain text, but setting the option to “regex” will allow SmartCrawl to run the appropriate filters.
Just make sure you know ...
SmartCrawl will advise you of this, but you will need to use the full URL when you use a Regular Expression. You can find out more by reading the help section on the WPMU DEV page.
These will be saved into your WordPress database, but you can achieve the same effect if you edit your .htaccess file. To create a 301 (Permanent) redirect, just add any of the lines to your code. To help, I’ve tried to make them intuitive, even without the comments for each option.
To create a 302 (Temporary) redirect, just add any of these lines to your code.
Let's bring it back ...
There’s everything you will need to know and more about redirecting URLs. Hopefully this will have been useful for you. Got any questions? Any plugin recommendations? What about systems for other platforms? Head on down to the comments and let’s discuss.

